Adding length and volume to your hair with extensions can instantly transform your look and boost your confidence. Whether you’re aiming for glamorous locks or simply want to change up your style, 20-inch hair extensions offer a versatile option for achieving your desired look. In this step-by-step guide, we’ll walk you through the process of installing hair extensions of 20 inches, ensuring a seamless and natural-looking result.
Prepare Your Hair
Start by preparing your natural hair for the extensions. Wash and condition your hair as usual, and then gently towel dry it to remove excess water. Apply a heat protectant spray if you plan to use heat styling tools to blend the extensions with your natural hair. Next, use a tail comb to create a clean parting along the back of your head, separating the top section from the bottom section. Clip the top section of your hair away using sectioning clips to keep it out of the way while you work on the bottom section.
Section Your Hair
Once you’ve divided your hair into two sections, use the tail comb to create a horizontal parting about an inch above the nape of your neck. Secure the rest of the hair above this parting with a hair tie or elastic to keep it separated. Clip the bottom section of hair just above the parting to keep it neatly out of the way. This will create a clear and defined space where you can easily install the extensions.
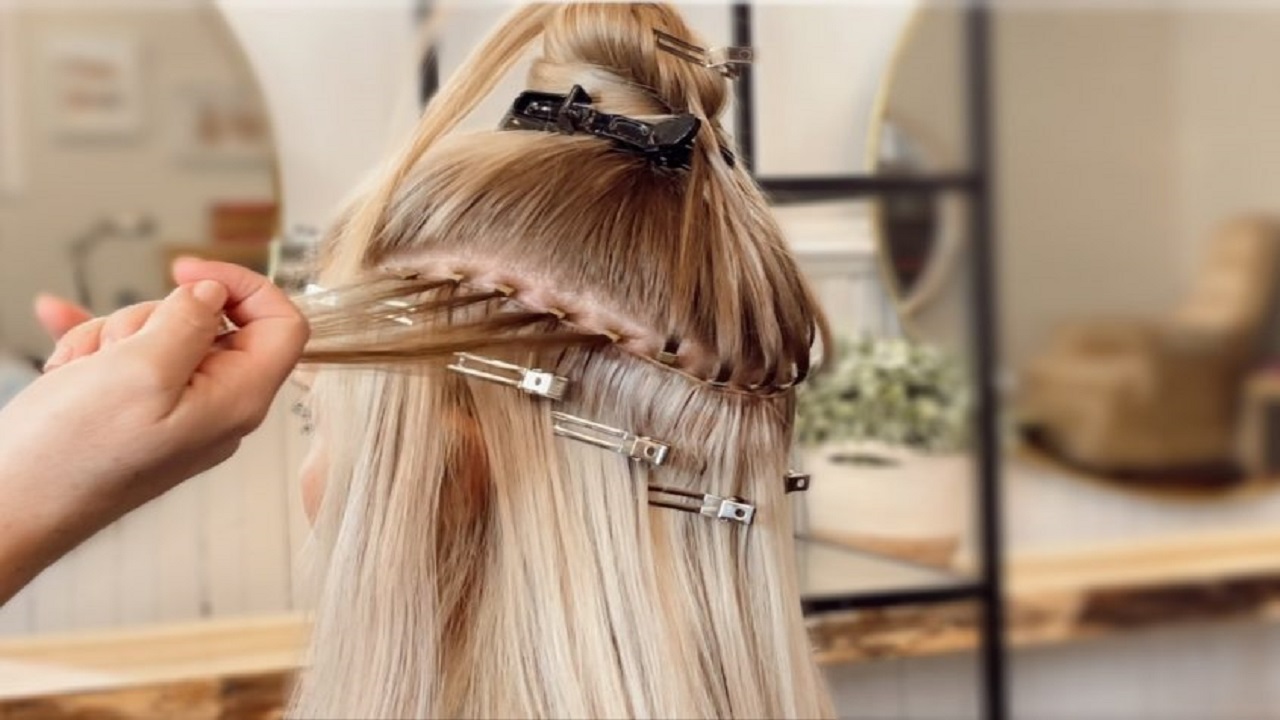
Install the Extensions
Now it’s time to start installing the 20-inch hair extensions. Begin by selecting a weft of extensions that matches the width of the sectioned-off area at the back of your head. If necessary, you can use scissors to trim the weft to fit perfectly. Starting from the center of the back of your head, gently tease the roots of the sectioned-off hair to create a bit of texture and grip. This will help the extensions to stay in place more securely. Next, apply a small amount of hair extension glue or tape adhesive to the top of the weft, then carefully press it onto the teased roots of the sectioned-off hair. Hold the weft in place for a few seconds to allow the adhesive to bond with your natural hair.
Continue installing additional wefts of extensions in the same manner, working your way up toward the crown of your head. Be sure to leave a small gap between each weft to allow for natural movement and prevent the extensions from feeling too heavy or bulky.
Blend and Style
Once all the extensions are in place, release the top section of your hair and gently comb through it to blend it with the extensions. Use a hair straightener or curling iron to style your hair as desired, creating seamless transitions between your natural hair and the extensions. Finally, apply a small amount of hair serum or oil to add shine and smooth any frizz or flyaways. Take a moment to admire your newly installed 20-inch hair extensions and enjoy your refreshed and glamorous look!
Conclusion
Installing 20-inch hair extensions is a simple and straightforward process that can yield stunning results when done correctly. By following this step-by-step guide and taking the time to properly prepare and install the extensions, you can achieve a natural-looking and seamless blend that enhances your hair’s length and volume. So go ahead, embrace the versatility of 20-inch extensions, and unleash your inner hairstyling prowess!